

The Digimap tab allows you to take control of some playlist parameters from a sensor or an external device.
This way, you can add interactivity to your show.
For instance, you can move a panel on a stage (with the projection moving along with it).
You can also change the layer opacity from a lighting control, or control your show from a custom OSC control panel, etc.
Add a new Digimap by clicking on the + button.
Trigger:
For each new Digimap, you have to select a device and setup the value to grab.
Patch:

Once your trigger is selected, you can create a patch to take the control of the parameters with this digimap.
You can interact with parameters of a playlist or on an X-Map:
Playlist:

Select Enable Playlist to control a media scale or position in a specific layer and cue; or all media in the same Layer throughout all Cues in one Playlist.
For example, add a Digimap to modify the x position of the first layer in the cue number 3, or move from an input value all the x positions of the first layers of a playlist.
| Position x | layer position x | |
| Position y | layer position y | |
| Scale x | layer scale horizontal | value in % |
| Scale y | layer scale vertical | value in % |
| Rotation | layer rotation | value in ° |
| Opacity | layer opacity | value in % |
| Mask Position x | Mask layer position x | |
| Mask Position y | Mask layer position y | |
| Mask Scale x | Mask layer scale horizontal | value in % |
| Mask Scale y | Mask layer scale vertical | value in % |
| Mask Rotation | Mask layer rotation | value in ° |
| Mask Opacity | Mask layer opacity | value in % |
| Global Position x | Global position x | |
| Global Position y | Global position y | |
| Global Scale x | Global scale horizontal | value in % |
| Global Scale y | Global scale vertical | value in % |
| Global Rotation | Global rotation | value in ° |
| Global Opacity | Global opacity | value in % |
| Global Mask Position x | Global Mask position x | |
| Global Mask Position y | Global Mask position y | |
| Global Mask Scale x | Global Mask scale horizontal | value in % |
| Global Mask Scale y | Global Mask scale vertical | value in % |
| Global Mask Rotation | Global Mask rotation | value in ° |
| Global Mask Opacity | Global Mask opacity | value in % |
| Red | adjust the layer red component | value in % |
| Green | adjust the layer green component | value in % |
| Blue | adjust the layer blue component | value in % |
| Global Red | adjust the global layer red component | value in % |
| Global Green | adjust the global layer green component | value in % |
| Global Blue | adjust the global layer blue component | value in % |
| Launch cue | launch a cue | index of the cue |
| Launch cue skip x2 | launch a cue | value is multipled by 2 to evaluate the index of the cue |
| FX1 | value of the first parameter of the fx | |
| FX2 | value of the second parameter of the fx | |
| FX3 | value of the third parameter of the fx | |
| FX4 | value of the 4th parameter of the fx | |
| FX5 | value of the 5th parameter of the fx |
| Speed | speed of the movie layer | value in % |
| Global Speed | global speed of the movie | value in % |
X-Map:

• Select Enable X-Map to affect the opacity and the RGB values of an X-Map shape.
| Red | adjust the X-Map red component | value in % |
| Green | adjust the X-Map green component | value in % |
| Blue | adjust the X-Map blue component | value in % |
| Opacity | adjust the X-Map opacity | value in % |
Digimap calibration:
In order to program the trigger, you will need to calibrate the incoming value (In A) which is the starting point; and the incoming value B (In B), the end point.
Then you will have to assign a value (i.e. media position in pixels) as a starting point, and a value for the end point.
Once this is done, it will generate 2 new values: The Offset (in pixels) and the coefficient {*}.
The following example shows the steps for the calibration of a media projected on a moving panel using a Rotary IP device to trigger:
Once you have assigned the media on the Patch tab, go to the trigger tab to calibrate the media accordingly to the Rotary values.
• Click on the trigger bar to select a device to trigger: Digimap 01, will be triggered by the Rotary-IP01
NB: In order to cover a smooth tracking of a panel on which we want the media on Layer 1, Cue 2 to follow, we will have to calibrate the maximum distance possible between the Start position A and the End position B.
• Move the panel physically on the Start position (A)
• Simulate the encoder’s value in position (A)
• Select 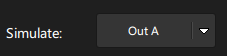 in order to calibrate the Start position
• Click on the  to set a Starting position encoder value
• Now, simulate the A point in pixels: Move with the mouse on the white box to calibrate and set the Out A
• Then, return back to 
• Now, move the panel physically on the End position (B)
• Select 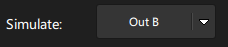 to calibrate the end position
• Click on the  to set an Ending position encoder value
• Now, simulate the B point in pixels: Move with the mouse on the white box to calibrate and set the Out B
• Then, go back to
• Once the Start and End position are calibrated, click on 
This action will set a *new Offset + *and a *new Coefficient * *value.
The Digimap process is over. Test it by moving the panel.
Digimap DMX settings:
Need more help with this?
Don’t hesitate to contact us here.