

To manually create an output, click on the ![]() button.
button.
You can edit the name of your output.
Then, adjust the part of the pixel workspace you want to display in this output, as well as the position and resolution of your output in your desktop.
Map: Adjust the top-left position and the size of the extracted area in your pixel workspace
Out: Adjust the top-left position and the size of your output in your Windows desktop
NDI Off/On button: Stream your output using NDI protocol. Please note that you cannot stream a warped output or an output with the X-Map feature
X-Map Off/On button: Activates the X-Map feature manually
Vertical Off/On button: Activate the Portrait mode if your video-projector is in Portrait mode for instance. When activated, Map width needs to be smaller than Map height (Portrait mode) but the Out width needs to be larger than your Out height (matching with the physical output of your graphics card).
Fill/Key Off/On button: Displays the Fill on an output and the Key (alpha level of the output converted to gray level) on the consecutive output. If, for example, you have one output with the top-left position at 0,0 and a resolution of 1920×1080 with this option activated, Modulo Player will automatically display the Key in gray level on the output with the top-left position 1920,0 and the resolution 1920×1080.
Mask sub-tab:
You can use a PNG still image as a mask on your output. It will use the alpha channel of your PNG as mask.
Color sub-tab:

Use this tab to adjust the color of each output. You can adjust the RGB gamma and level globally and/or by color channel.
Use the Reset button to quickly go back to neutral state.
Background sub-tab:
A background image can be displayed on each output to pre-warp prior to the installation. You can use a theoritical warping point of view as a background.
Soft edge tab:

You can adjust the soft edge on each side:
• Start: The start point in pixels to set up a crop
• Length: Soft edge length – starting from the start pixel
• Gamma & Gain: Adjust the transition curve
• BlackLevel: You can adjust the grayscale outside of the soft edge. It can help reduce the double video black on the soft edges.
Shape tab:
Use this tab to warp your output.

Top button bar

The Top button bar gives access to the following tools :
- Test Pattern: To display a test pattern on your output, use the drop down menu
![]() and choose from:
and choose from:
None: Disabled
Grid: Generated grid with the name of the output, soft edge adjust help lines, ratio helper
Fine Grid: Grid with smaller steps and soft edge helper
Grayscale: horizontal and vertical bars
Checkboard
SMPTE: color pattern
Colors
- Lock
![]() : Lock the warping to prevent any unintentional manipulation
: Lock the warping to prevent any unintentional manipulation
- Toggle Visibility
![]() : Enable/Disable the output
: Enable/Disable the output
- Toggle Control Points
![]() : Enable/Disable the display of control points on the server
: Enable/Disable the display of control points on the server
- Toggle Mouse accessibility
![]() : Enable/Disable the use of the mouse to move control points. When disabled, use the mouse to select a control point then use the keyboard arrows to move it
: Enable/Disable the use of the mouse to move control points. When disabled, use the mouse to select a control point then use the keyboard arrows to move it
- Map
![]() : Toggle between output warping and extraction warping
: Toggle between output warping and extraction warping
![]() : Extract a photo of the media currently displayed on the active Cue of the Playlist tab
: Extract a photo of the media currently displayed on the active Cue of the Playlist tab
Configuration: ![]()

In the top button bar (see picture “Top button bar “ above) , click on the configuration button ![]() to edit the warp mode and the number of control points per row and column.
to edit the warp mode and the number of control points per row and column.
Choose the warp grid mode: Keystone or Curve mode.
Curve Mode allows you to change the number of control points by selecting a number of rows and columns.
Tools:
Access to the toolbar is at the bottom left of the warping Area. Clicking on one of the following buttons to open their respective popup tool menu.

![]()
![]()
Selection tools:
Click on to access the following tools :
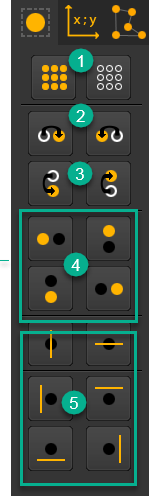
![]() Select/unselect all control points
Select/unselect all control points
![]() Select the control point on the right/on the left of the current selection
Select the control point on the right/on the left of the current selection
![]() Select the bottom control point/ the top control point of the current selection
Select the bottom control point/ the top control point of the current selection
![]() Select (add) the left / the top / the bottom / the right control point
Select (add) the left / the top / the bottom / the right control point
![]() Select the whole vertical/horizontal line of points
Select the whole vertical/horizontal line of points
NB: All these tools can also be accessed using keyboard shortcuts. For more information, please refer to the Shortcut section of this document.
List of Control Points:
Click on ![]() to display the control points with their respective pixel coordinates.
to display the control points with their respective pixel coordinates.

![]() Select/unselect all control points
Select/unselect all control points
![]() directly select/unselect the control points in this list
directly select/unselect the control points in this list
Advanced Control Points Edition:
Click on ![]() to access the following tools :
to access the following tools :
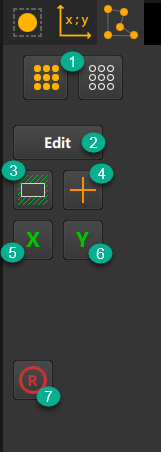
![]() : Select/deselect all control points
: Select/deselect all control points![]() Edit button : the popup panel allows you to offset, scale and rotate a selection of control points (with a minimum of 3 control points). You can also apply a symmetry.
Edit button : the popup panel allows you to offset, scale and rotate a selection of control points (with a minimum of 3 control points). You can also apply a symmetry.![]() Constrain points in the screen area
Constrain points in the screen area![]() View crosses instead of circle points
View crosses instead of circle points![]() Constrain the X axis
Constrain the X axis![]() Constrain the Y axis
Constrain the Y axis![]() Reset all selected points to their original values
Reset all selected points to their original values
Need more help with this?
Don’t hesitate to contact us here.