
In this panel you have access to the complete list of projectors of the scene.
Thanks to the toolbar you can add a projector, search by name and delete the selected projectors.
In addition, you can activate or deactivate a projector by clicking directly on the “power” button next to its name.

The more actions button ![]() in the toolbar allows you to import or export the complete list of your projectors in CSV format (readable by any spreadsheet program such as Excel).
in the toolbar allows you to import or export the complete list of your projectors in CSV format (readable by any spreadsheet program such as Excel).
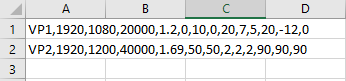
The import file format is:
- 1 line by projector. All parameters are separated by ,
- projname,resolutionx,resolutiony,lumens,throwratio,horizntalshift,verticalshift,positionx,positiony,positionz,yaw,pitch,roll
e.g:
![]()
The export file format is:
- the name of the projector
- the position (x,y,z)
- the orientation (yaw,pitch,roll)
- the aspect ratio
- the pixel resolution
- the throw ratio
- lens shifts (vertical and horizontal)
- the power in lumens
- the stack count
- the brand
- the series
- the precise model
- the name of the lens
e.g.
![]()

Settings
The projector has many parameters:

| Enable | activates the projection in the scene |
|---|---|
| Position | position of the projector in relation to its parent |
| Yaw | rotation of the projector around the Y-axis |
| Pitch | rotation of the projector around the X-axis |
| Roll | rotation of the projector around the Z-axis |
| Near | distance from which the projector sees objects (before this distance the objects do not appear in the projector’s view) |
| Far | the distance from which the projector no longer sees the objects (after this distance, the objects do not appear in the projector’s view) |
| Color | projector beam’s color |
| Show wire | displays the wire of the view cone and the box representing the projector according to its size parameters (see below) |
| Show beam | displays the projector’s beam |
| Test Pattern | drop-down list of test pattern |
| Source | current source, rendersurface or VNode output (see below) |
| Add to mask | adds the projector in the calculation of blending masks (3D layer) |
| Mask group | allows to create groups of masks to separate blendings |
| Luma fade | simulates the non-projection of the black |
| Black level | simulates the blackness that the projector can make |
| Aspect | set the aspect ratio of the projector (16:9, 16:10,…) |
| Resolution | pixel resolution of the projector, this value is only used in scene view modes |
| Throw ratio | equivalent to field of view |
| Overscan | set in % the projector POV overscan value |
| Vertical shift |
|
| Horizontal shift | horizontal offset of the rendering cone in percent |
| Lumens | luminous power of the projector, this value is only used in scene view modes |
| Stack count | simulate a stack of projectors, this value is only used in scene view modes |
| Rotation | applies a rotation to the projected image |
| Projection | front/rear mode |
| Use database | uses values from the database (see below) |
| Throw ratio min/max | limit values for the selected lens supplied by the manufacturer (if use database is enabled) |
| V. shift min/max | limit values for the selected lens supplied by the manufacturer (if use database is enabled) |
| H. shift min/max | limit values for the selected lens supplied by the manufacturer (if use database is enabled) |
| Width | width of the box representing the projector |
| Height | height of the box representing the projector |
| Depth | depth of the box representing the projector |
| Promote | turns this projector into a camera |
| Shadow resolution | improves the accuracy of the projection for faces almost parallel to the projection |
| Cast proj | |
| Cast shadows | |
| K1-K2-K3-T1-T2 | optical distortion coefficients of the camera |
| load lens calib | allow you to load lens calibration file |
Luma fade & black level
 |
 |
 |
 |
Shadow resolution
 |
 |
Database
Kinetic includes piXap’s database of projectors and lenses to perform your implantation simulations.
To use it you just have to activate the option “use database”, a window will open and you will be able to choose the brand, the model and the lens according to your project.
 |
Once your projector is set up you can change the lens or change the whole projector at any time.
 |
Projections
Kinetic rendersurfaces and the outputs of the VNodes can be used as projected textures in projectors.
To do this you must drag and drop a rendersurface (or output) from its panel into the source field of the projector.
By doing this you have the possibility to play any content (video, image, live,…) directly projected into your 3D scene.
Drag and drop in a timeline
You can drag and drop any projector from your scene into one of the timelines. This will then create a rendering layer from that projector’s point of view.
Drag and drop in a graph
You can drag and drop any projector from your scene into a graph. You will then have access to the different values of the projector, in read or write mode.

Need more help with this?
Don’t hesitate to contact us here.