
Description
This node enables you to run javascript in the graph editor.
This can be very useful when doing complex conditional operations, complex maths or to interact with an HTTP object that can be created in the Devices tab.
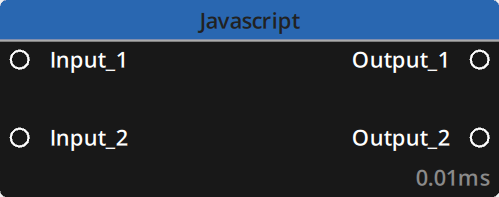
You can add as many inputs and outputs to the node as you require. Here it is shown with 2 inputs and 2 outputs.
Properties
This node has three tabs in the Editor panel :
Input: Add inputs, rename them and choose their types.Output: Add outputs, rename them and choose their types.Script: Declare any global variables in the Global section and input your javascript code in the Main section.
Inputs
| Name | Type | Description |
|---|---|---|
| Input_# | Variable | Input number # |
By default the inputs are labelled input_# with # incrementing with each input. They can all be renamed in the Input tab of the Editor panel. The default type is Float.
Outputs
| Name | Type | Description |
|---|---|---|
| Output_# | Variable | Output number # |
By default the outpus are labelled output_# with # incrementing with each output. They can all be renamed in the Output tab of the Editor panel. The default type is Float.
Examples
Using inputs and outputs
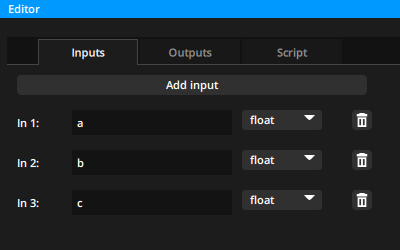
To illustrate how to use custom inputs and outputs we’ll write a javascript code that solves quadratic equations. More information on quadratic equations can be found here.
In our Javascript node, we’ll configure the Inputs and Outputs tab in the Editor panel :
 |
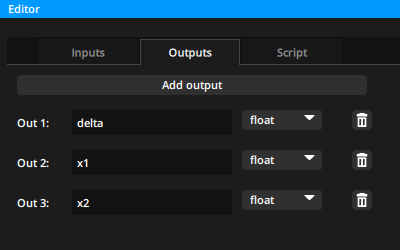 |
Now to use these inputs and outputs in our code, all we have to do is call them using the exact same name and spelling used in those two tabs.
Here is the script in the Main section of the Script tab :
delta = b*b - 4*a*c
if (delta >= 0) {
   x1 = (-b + Math.sqrt(delta)) / 2*a
   x2 = (-b - Math.sqrt(delta)) / 2*a
}
else {
   var imPart = Math.sqrt(-delta) / 2*a
   var rePart = -b / 2*a
   x1 = rePart + " + " + imPart + "i"
   x2 = rePart + " - " + imPart + "i"
}
And this is the result of our setup :
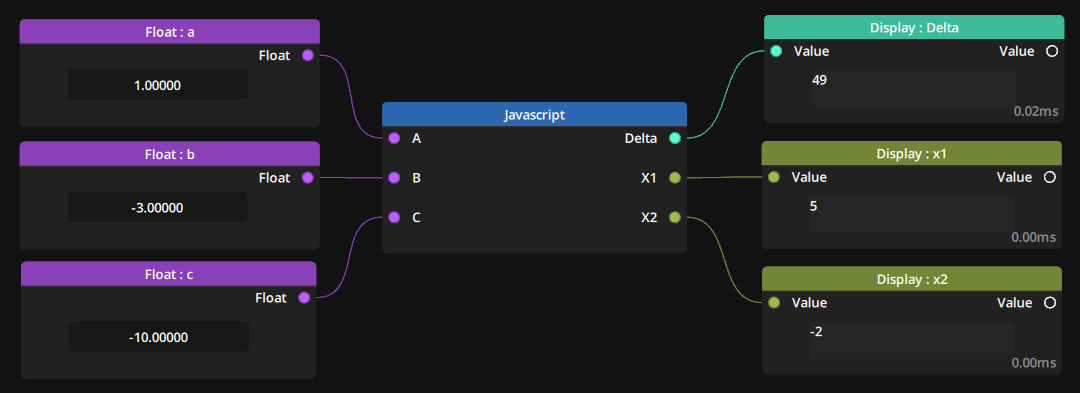
As we can see, the equation y = x² - 3x -10 has two different solutions because Δ>0. The solutions are x1 = 5 and x2 = -2
Working with arrays
Consider this setup where we have two arrays. Let’s see how to extract specific data from these arrays using the Javascript node.
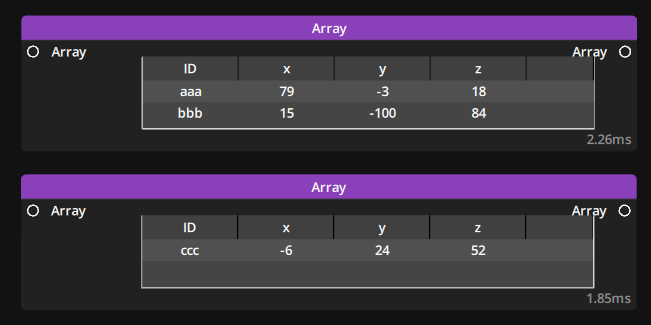
First let’s configure the Inputs and Outputs tab in the Editor panel :
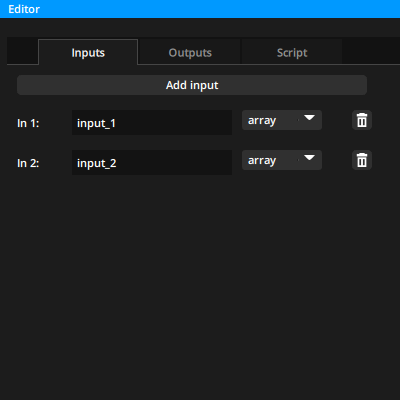 |
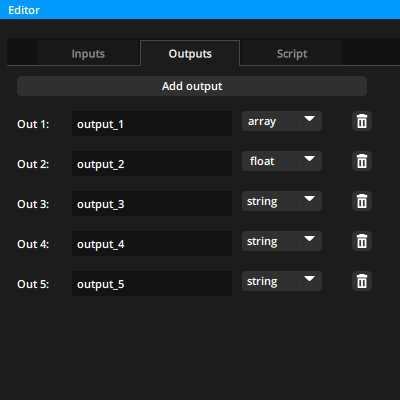 |
Here is the script in the Main section of the Script tab :
output_1 = input_2
output_2 = input_1["bbb:x"]
output_3 = input_2_ids[0]
output_4 = input_1_ids[1]
output_5 = input_2_propertiesName[2]
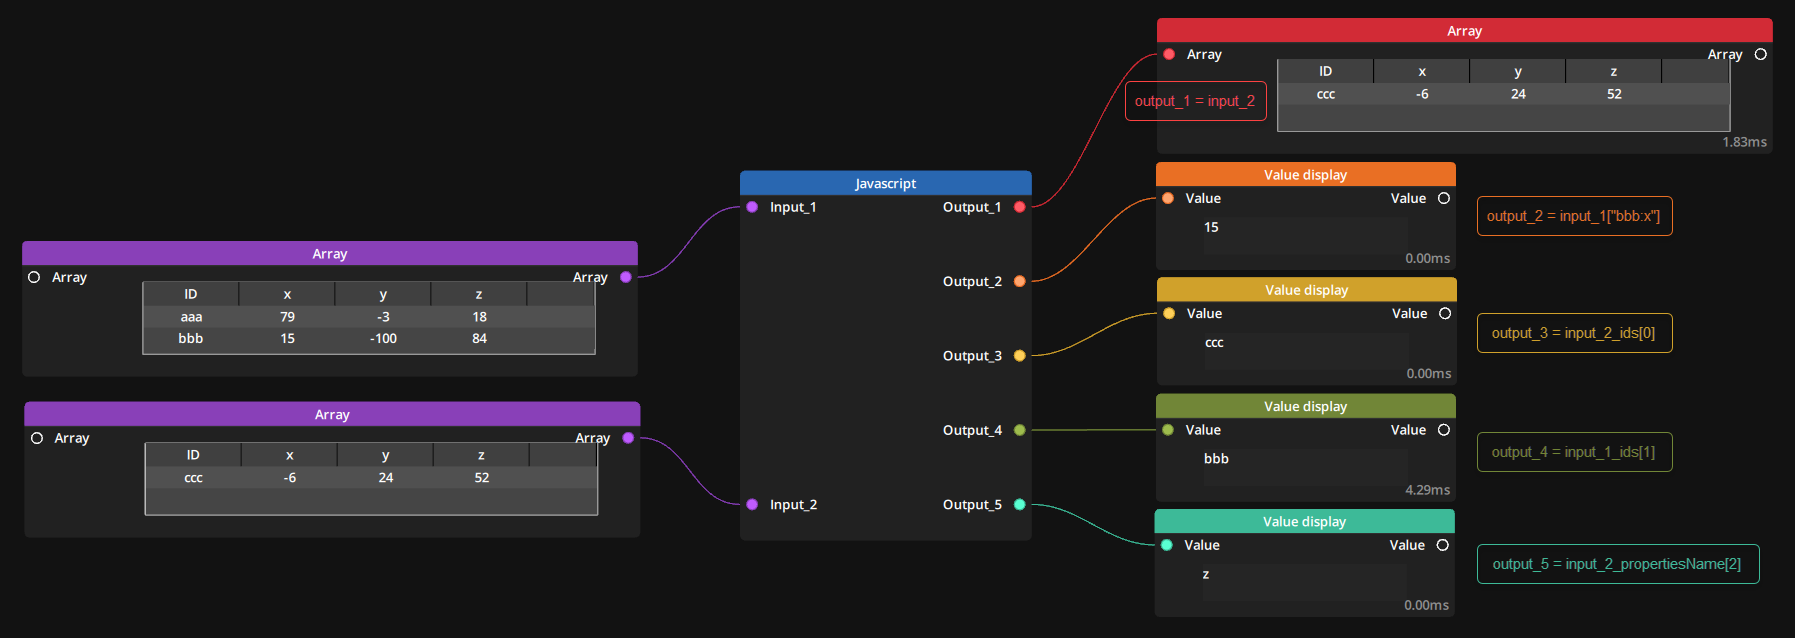
Let’s detail line by line how we configured our outputs using javascript :
output_1 = input_2: In output_1 we’ll output whatever we plug into input_2 as is, without modification.
output_2 = input_1["bbb:x"]: In output_2 we’ll look into our input_1 for an ID namedbbband for that ID we’ll extract whatever value is held by the property namedx.
Note : If the IDbbbdoes not exist in the input, or if it does not have a property namedxthen the output will be empty.
output_3 = input_2_ids[0]: In output_3 we’ll look into our input_2 and extract the ID for the index 0.
output_4 = input_1_ids[1]: In output_4 we’ll look into our input_1 and extract the ID for the index 1.
output_5 = input_2_propertiesName[2]: In output_5 we’ll look into our input_2 and extract the name of the third property.
Note : Properties, like indexes, are numbered starting from 0. Hence,propertiesName[2]points to property number 3, and not number 2.
Using an HTTP device to fetch JSON data on the web
In this example we’ll illustrate how to use the Javascript node to parse JSON data that we’ll retrieve on the web.
We’ll be using the Open Weather Map API that can be found at this address.
Setting up the HTTP Device :
Let’s start by creating an HTTP device in the Devices panel. In the Editor panel we’ll activate the Use URL option for the HTTP device.
Note : It is not necessary here to input the API URL in the URL field because the node we will use to query the server in the compute graph requires the URL to be specified on its input.

Setting up the Compute Graph :
Once the device is created, open a compute graph and drag & drop the device to create two nodes : Send GET URL and Receive Message.
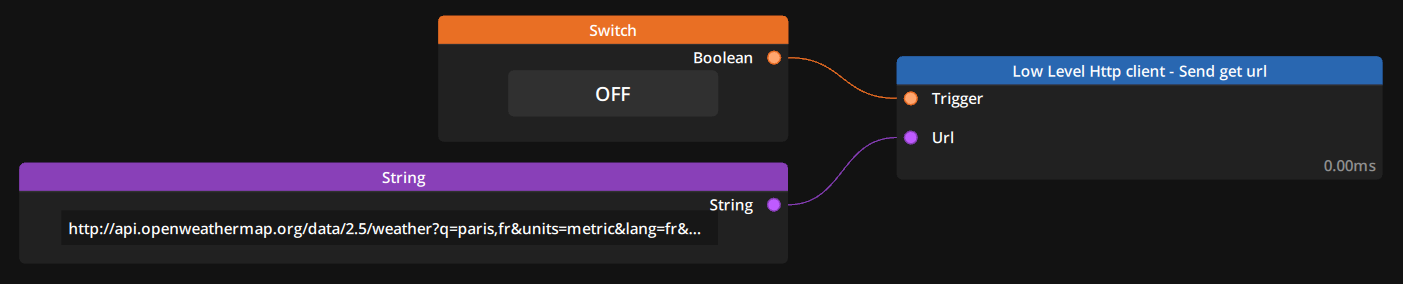
The first node is configured to send a GET message to the API by specifying all the options we need directly in the URL, as illustrated below :
The second node is configured to receive the response from the server. We’ll write its output to a String Variable that we have created in the Variables panel and that we have named JSON API.

Now when we toggle the trigger input of the Send GET URL node we’ll receive a JSON object that can be parsed using a javascript node. This can be done either in the same compute graph, or in a render graph.
To retrieve the data in a Render Graph, it must first be written into a Variable.
Setting up the Javascript node in a Render Graph:
Create a Render Graph and with the graph selected, go to the Editor panel and create a String input. Drag & drop the input into the render graph.
Drag & drop the render graph in a timeline to create an instance of it. By selecting that instance we can link the JSON API variable to the input we just created.
Now the JSON data will be linked in the render graph and can be input into a Javascript node.
More details on how data is linked to render graphs can be found in the dedicated series of tutorial.
Parsing the JSON Data :
This is a sample of what the API returns when queried. Note that the JSON has been indented here to improve readability :
{
  "coord": {
    "lon": 2.3488,
    "lat": 48.8534
  },
  "weather": [
    {
      "id": 800,
      "main": "Clear",
      "description": "ciel dégagé",
      "icon": "01d"
    }
  ],
  "base": "stations",
  "main": {
    "temp": 6.73,
    "feels_like": 5.33,
    "temp_min": 4.97,
    "temp_max": 8.54,
    "pressure": 1035,
    "humidity": 87
  },
  "visibility": 8000,
  "wind": {
    "speed": 2.06,
    "deg": 140
  },
  "clouds": {
    "all": 0
  },
  "dt": 1676284536,
  "sys": {
    "type": 2,
    "id": 2041230,
    "country": "FR",
    "sunrise": 1676271788,
    "sunset": 1676308003
  },
  "timezone": 3600,
  "id": 2988507,
  "name": "Paris",
  "cod": 200
}
Here is the script we write in the Javascript node to retrieve the data from the JSON string :
const obj = JSON.parse(JSON_in);
let coord = obj.coord;
let main = obj.main;
out_1 = coord.lon;
out_2 = coord.lat;
out_3 = main.temp;
The JSON.parse() method will parse our JSON string into a Javascript object. We can then call our different properties using javascript .name notation.
Note that to use them as output they must first be stored in a local javascript variable, this is why we extract them using lines such as let coord = obj.coord;
Need more help with this?
Don’t hesitate to contact us here.